

If you’re like the average American family, you likely have leftovers from your Thanksgiving feast.

In my household, I always make too many servings of mashed potatoes in case there’s a guest or two looking to pack in some extra carbs enveloped in butter, cream cheese, milk and cream to stock up for the winter.

I also had some leftover spinach and mushroom from my salad so I was inspired use them all for my morning after breakfast.
I decided to take a stab at potato pancakes. I’ve never made them before and was envisioning them tasting a bit more like hash browns but truthfully, they taste like pancakes. Since they were my first batch, the pancakes definitely look homemade but are still actually quite good.

POTATO PANCAKES (makes 8-10 servings)
8 heaping tablespoons of mashed potatoes
1 cup of all-purpose flour
1/2 onion, finely chopped
1/2 container of chives, finely chopped (probably should have used the whole thing to add a bit more savory flavor)
Black pepper
Dill weed
2 tablespoons of butter, melted
2 eggs, scrambled

1. Place the leftover mashed potatoes in a large bowl and combine with the flour and eggs, mixing it up until the consistency thickens, adding more flour if necessary for it to look like a pancake batter.
2. Add the rest of the ingredients until they’re evenly mixed into the batter.
3. Set the stove to high, add butter to the griddle and let it melt, coating the entire surface of the pan.
4. Leave the stove on high and use your hands to mold the potatoes into a small round ball and place onto the hot griddle.

5. Flatten the potatoes with the back of the spatula. (This is a step I omitted because I didn’t know any better. The outsides were crisp while the insides were thick and creamy. If that’s more your speed, leave them round and doughy.)
6. Flip to crisp up the other side and flatten if desired.
7. Depending on the number of pancakes and the strength of your range, the pancakes should be cooked in about 10-15 minutes.
8. If you have it, you can add a small dollop of sour cream and cut up a bit more dill as a garnish.

I also wanted an egg dish of some sort so I grabbed my eggs, spinach and mushrooms and got to work.

SPINACH AND MUSHROOM EGG SCRAMBLE (6-8 servings)
1-2 handfuls of spinach
3-5 mushrooms
1 tablespoon of butter
1-2 handfuls of shredded cheese
12 eggs, scrambled
1. If you have a food processor, I like to throw in the spinach and mushrooms and give them a fine chop to make them uniform while they cook.
2. I set the stove on high and melt the butter onto a pan, swirling it around, coating the entire surface.
3. I leave the stove on high as I pour the egg batter.

4. As the egg starts to cook, I spoon in the spinach and mushroom, adding cheese to the top.
5. You can season with black pepper, oregano and rosemary if it strikes your fancy.
6. I use the spatula to mix up the egg scramble until it’s fully cooked.
7. Depending on the range, it should take 10 minutes to finish.

If all the prep work is done prior to cooking, you should be able to cook both dishes at once.
Since there’s only two of us, we will be having these pre-made breakfast treats for days giving ourselves Thanksgiving leftovers for both breakfast and dinner. Two for one! Enjoy!!
Disclosure: As an Amazon Associate, the links provided above provide a referral fee for any qualifying purchases you make.
It dawned on me a little while ago that this year will mark my 20th anniversary of hosting Thanksgiving Dinner. Though there were a few years in between when I took time off from hosting, for the most part, I’ve made it a point to welcome friends and family to my home and to my table for one of my favorite holidays.
My first attempt at roasting a turkey was actually the year I graduated college. It was an epic fail as I kept opening the oven door and not letting the turkey roast. After 10 hours, the bird still wasn’t cooked and I ended up discouraged and frustrated, daunted and fearful of failure.
Luckily, years later, I came upon Martha Stewart’s magazine, immersed myself in her recipes and was finally able to put together my first Thanksgiving feast with all the fixings. Over the years, I’ve edited and revised how I prep and roast my turkey as well as the side dishes and am passing on my best tips that I’ve acquired through trial and error.
The key is to plan ahead and know what will be served and back into how much time it will take to get the dishes ready for dinner. More importantly is having the proper tools at one’s disposal so as to prevent any last minute mini panic attacks.

I start buying items on my Thanksgiving list two weekends prior to Thanksgiving, leaving the turkey, basil, dairy, potatoes and green vegetables for the weekend prior to the holiday. I spread out the table setting prep from Sunday through Tuesday the week of Thanksgiving, checking the linens, silverware, glassware and dinnerware for cleanliness and washing and drying if necessary. Though I have a complete fine china setting, I find a more casual modern tableware to be easier to work with and less expensive to replace if something should get damaged or break, diminishing my stress level the night of festivities. I set the table by no later than Tuesday night.
I start prepping the turkey no later than the Sunday prior. About 14 years ago, a contractor who was working on on our home told me about brining. I hadn’t heard of the technique but he said that brining tenderizes the turkey and shared with me a very simple brine tip: use tons of kosher salt and fill a huge pot with ice, letting the turkey sit in the fridge for a few days.

I’ve since modified that recipe and just a few days ago found a handy brine kit with both the bag for a 30 lb bird and organic spices at Whole Foods. This upcoming weekend, I will take my large stockpot and after cleaning out the bird, rinsing it and seasoning it with brine and kosher salt in the bag, I’ll hoist it into the stockpot and fill it up with ice cubes, letting the dried herbs seep into the crevices of the turkey while it sits in the refrigerator for a few days.
On Thanksgiving morning, while I prepare breakfast, I’ll take the turkey out from the pot, rinse it out and pat it dry, let it rest on the roasting pan for an hour in room temperature while pre-heating the oven and start on the cornbread.


In every homemade feast, one should not be ashamed to get a bit of help. I’ve made cornbread from scratch in the past, but it takes a lot of ingredients to put it together and much longer to prepare. Last year I came upon the organic version of Marie Callendar’s cornbread which I couldn’t find at Costco or Smart & Final this year. Luckily, on my shopping trip to Whole Foods, I discovered they sold them so I bought a few packets. What I usually do is boil some organic corn to add to the mix before baking and after it’s done, I drizzle some organic honey. I test the doneness by placing a toothpick or small fork in the middle to see if it comes out clean. I set it aside on the countertop and loosely cover it with aluminum foil. An hour before the guests arrive, I place it in the warming oven.
After the cornbread is baked, I replace it with the turkey. I remove the middle rack, using an oven mitt and set the convection oven temperature to 475 degrees. The roasting pan and rack are incredibly important to having an evenly roasted and moist turkey. At any given time, the turkey could potentially dry out so having the proper tools during the process is key. The rack keeps the turkey raised, allowing the heat to circulate around all parts of the turkey so that it can cook evenly.
While the oven is rising to the proper temperature, I work on prepping the turkey. First I take either chicken broth/stock, white wine and/or lemon juice and give the turkey a rinse while it sits on the rack on top of the pan allowing the liquid to collect at the bottom of the pan which will allow some moisture to seep into the bird during the long roasting time. Then I take 2 sticks of butter and melt it in a saucepan at a low temperature while continuing my prep, watching to make sure it doesn’t burn. In the meantime, I take organic basil, rinse it out, dry the leaves on paper towels, remove the leaves from the stems and grind it in the food processor.
I’m now ready to season the bird, I take my black pepper and no salt seasoning, coating the outside, the inner cavity and flipping it over, coating the opposite side. Then I take the basil and stuff it in the main cavity and put a bit in the other end in the much smaller cavity. I halve or quarter a few lemons and stuff those in both cavities before tying up the legs and secure the turkey in twine, placing it breast side down on the roasting rack as the breast tends to dry out and cook faster.

By now, the butter should have melted. I cut up a piece of the cheesecloth which should cover the turkey that’s exposed, leaving a few inches extra to tuck under. I dunk the entire piece of cheesecloth and drape it over the body of the turkey using tongs and using a baster to pour any of the leftover butter gently over the turkey. It’s now ready to set in the oven and should be basted with two sticks of melted butter every hour. I set the timer for 50 minutes so I can start melting the butter and be ready to baste at the one hour mark, repeating the cycle of dunking the cheesecloth and using a baster to coat the turkey with liquid butter every hour. Depending on the size of the turkey and the specific oven, flip breast side up halfway through the cooking time and continue the basting routine. Aluminum foil is also important as the turkey nears the end of its roasting time. The wings tend to crisp up faster, depending on the oven, and the aluminum foil slows the process down a bit. I create a loose tent over the turkey in the last hour, allowing the heat to enter but shielding the skin from crisping up too quickly. Near the end of the roasting time, I test the temperature of the breast and the the thigh, lowering the temperature to 350 degrees.

When it’s close to the proper internal temperature and the skin looks like it’s starting to brown too much, I take the turkey out of the oven and let it rest on the countertop. It will still continue to cook from the heat as long as it’s covered with aluminum foil, preventing the heat from escaping. A sign that the turkey is cooked when the juices run clear.


Simultaneous to the turkey going in the oven, I start to work on the mashed potatoes. I place a pot 3/4 full of water on the stove and set it on high as I begin working on Martha Stewart’s recipe: https://www.marthastewart.com/319180/big-marthas-mashed-potatoes-with-cream-c


I’ve never bothered creating another recipe because Martha’s is so incredibly creamy that gravy becomes unnecessary reducing my time in the kitchen. Plus, it’s such an easy recipe that there’s no need to reinvent the wheel. I try to use Yukon Gold potatoes as they’re creamier but one thing to note regardless is it takes at least an hour to boil depending on your stove top. Test the potatoes for doneness by using a fork to see if they’re tender. Once they’re done, drain the potatoes in a colander and return the potatoes to the pot, letting them sit with cubes of ice to cool them for a few minutes. The skin easily peels off when the potatoes are hot but it’s a challenge because of the heat so adding a bit of ice makes the task manageable. Place the skinned potatoes in a bowl and quarter them on a cutting board before placing them into the Kitchen Aid mixing bowl with the ingredients. I omit the salt in mine so while mixing, I taste mine and add either some extra black pepper, butter or cream cheese which is why I double the amount of ingredients than what is called for in the recipe. My mixer is crucial in the preparation as nothing else I’ve used in the past has given me the desired end result. Once the potatoes are ready, I set the them aside in a pan and cover it with aluminum up foil as I work on my other dishes. An hour prior to our guests’ arrival I place it in the warming oven with the cornbread.

To add a bit of color, I usually incorporate a green vegetable dish. Last year, I boiled some frozen green beans and tossed it in some organic olive oil, a bit of garlic and zested it with some organic lemon. It was a very simple, colorful healthy dish.


This year, if Coscto has it in stock, I’ll probably roast some Brussels sprouts which are also very simple to make. I rinse the Brussels sprouts and pat them dry with paper towels. Then I halve or quarter them, placing them in a bowl, drizzling them with a bit of extra virgin olive oil, seasoning them a bit with sea salt and pepper and mixing the oil and spices throughout evenly, using my hands. I place them on an oiled aluminum foil resting on top of a cookie sheet and spread them equally across the pan. I roast them at 475 degrees and use tongs to flip each one after 10 minutes and depending on the oven, take them out after 20 minutes. They’ll have a beautiful slightly charred smoky caramelized flavor.

The last thing I prepare is the salad. I use organic baby spinach, slice up some organic English cucumbers, add organic honey cashews and organic dried blueberries and the salad is complete. I’ve added chunks of organic avocado and slices of organic white mushrooms in the past as well. I have 2-3 different kinds of dressing available for our guests.
Hosting a Thanksgiving dinner should not involve slaving away for days prior in addition to all of Thanksgiving Day. The key is to plan ahead and check off some of the tasks ahead of time. Some years, I’ve baked the cornbread a day or two beforehand. Conceivably, one could make the mashed potatoes early as well since both keep well and are easily reheat-able in the oven. It would minimize the tasks on Thanksgiving and alleviate the pressure to finish all the cooking in time. Last year, I used the disposable half steamers to serve the side dishes. I had them set up in wire chafing stands with chafing wick fuel keeping the food warm as we ate. Whatever leftovers we had, I covered them with aluminum foil and stored them in the fridge which made cleanup a breeze.
It’s also good to start an annual tradition or routine. For me, Thanksgiving begins with the Macy’s Thanksgiving Day parade as I start the prep and breakfast. It gets me in the spirit and the right frame of mind and signals that it’s a day of celebration. After that ends, I switch the channel to Food Network where they inevitably have a Countdown to Thanksgiving marathon on which helps add to the excitement and sometimes provides valuable last minute time-saving tips.
Thanksgiving is truly one of my favorite holidays because I have the opportunity to spend time with people I care about in the comfort of my home while enjoying a healthy, homemade, organic feast. I am always filled with gratitude that my life has been blessed with an abundance of friends who over the years, I’ve come to consider my family. Though not all of them can share the evening with me, Thanksgiving gives me the opportunity to give back to a select few and that is the cornucopia of the holiday for me.
Turkey checklist:
Turkey
Brine
Extra large stockpot
Kosher salt
Ice cubes
Twine
Cheesecloth
Aluminum foil
Saucepan
Roasting pan with roasting rack
Liquids: carton of chicken broth/stock, bottle of white wine and/or lemon juice
Baster
Tongs
Food processor
Temperature gauge
Oven mitts
Basil
Lemons
Black pepper
No-salt seasoning
8 sticks of unsalted butter
Carving board
Carving knife
Turkey plate
Mashed potatoes checklist:
3 1/2 lbs potatoes
16 oz cream cheese
2 sticks of unsalted butter
1/2 cup whole milk
1 cup heavy cream
Black pepper
Ice cubes
Stockpot
Colander
Kitchen Aid Mixer
Pyrex measuring cup
Serving dish
Cornbread checklist:
Marie Callendar’s mix
Extra virgin olive oil or spray
Cake pan or half steamer pan
Corn
Honey
Water
Baking/serving dish
Green beans checklist:
Stockpot
Frozen or fresh green beans
Lemons
Garlic
Extra virgin olive oil
Zester
Serving dish
Brussels sprouts checklist:
Brussels sprouts
Sea salt
Black pepper
Extra virgin olive oil
Aluminum foil
Cookie sheet
Serving dish
Disclosure: As an Amazon Associate, the links provided above provide a referral fee for any qualifying purchases you make.

There’s nothing like the fear of mortality to make one quake in their boots. My husband was born with a dilated ascending aorta. He first saw a cardiologist about his condition 10 years ago and had been monitoring it annually for about 5 years. Then because the dilation hadn’t expanded and life got chaotic and busy, he didn’t get return to the doctor for the past 5 years.
Earlier this year, we both suffered a long bout with the season’s cough and cold which plagued many, sometimes, like myself, twice over. Exhausted and not feeling 100%, my husband reached out to his cardiologist and after an initial diagnosis, followed by an EKG, a stress test and a CT iodine scan, it was concluded that at some point in the past 5 years, his aorta had expanded .3-.4 cm to 4.9/5 cm. In addition, he has plaque in his heart, has higher than average cholesterol, and he’s in the top 10% worst condition for somebody of his age. If his aorta expands another .5 cm, he has to have surgery or risk it bursting which could be fatal. Saying that to somebody who has been a personal trainer for decades and has led a fairly healthy lifestyle was like dropping a bomb on Pearl Harbor. It just came out of nowhere.
We both went into shock and then I began internalizing some of the stress. I had problems sleeping, concentrating, I felt like I was in a constant fog, and by midweek last week, I thought I was going to have a stroke on the right side of my face. I felt tingling under my eyes and pressure on my right temple and cheekbone. I started taking baby aspirin daily and began thinking about what I/we could do to mitigate the stress.
What we both realized after we took a few steps back is that we’re getting older. Just like a car, the older it gets, the more care it needs. We both took a hard honest look at our diets and lifestyle and started discussing changes.
For my husband, he opted to eliminate all eggs and reduce his consumption of poultry. A vegan client of his mentioned a recent study that all meat, including chicken, has cholesterol. I reminded him that he would not be able to survive on quinoa, beans and veggies alone so we reached a compromise. In lieu of his daily ration of 2 hard boiled eggs I would make organic egg white veggie frittatas. I also offered to bake previously marinaded chicken breasts and carve him deli slices for his sandwiches instead of the high sodium deli meats sold at the supermarkets. In lieu of cheese, I suggested using hummus to add some moisture to his sandwiches. To mix it up I also offered to make chicken salad to swap out the deli meat and in lieu of mayonnaise, use Greek yogurt and mustard. I usually pack him 2 hot meals but I suggested swapping one hot meal for a chicken or salmon salad.
That is the inspiration for these new recipes and dietary tweaks. The first healthy swap is organic chicken salad in lieu of deli meat. People incorrectly assume that eating a sandwich with deli meat is quite healthy. The harsh reality is if it’s processed deli meat, even if it’s organic, it likely has been processed with a great deal of salt and nitrates to preserve the meat and have it last for a long period of time. Neither are beneficial for even the healthiest of people.
In addition, the usual slice or two of cheese is also not the best option for somebody with high cholesterol and a heart condition. Again, even the organic slices of cheese have saturated fat and cholesterol as well as sodium, for preservation.
The best option is to either make your own deli meat, which I will discuss in a later post, or find an a more decadent swap and that is the recipe I put together today. I’ve also listed where I purchased the ingredients.
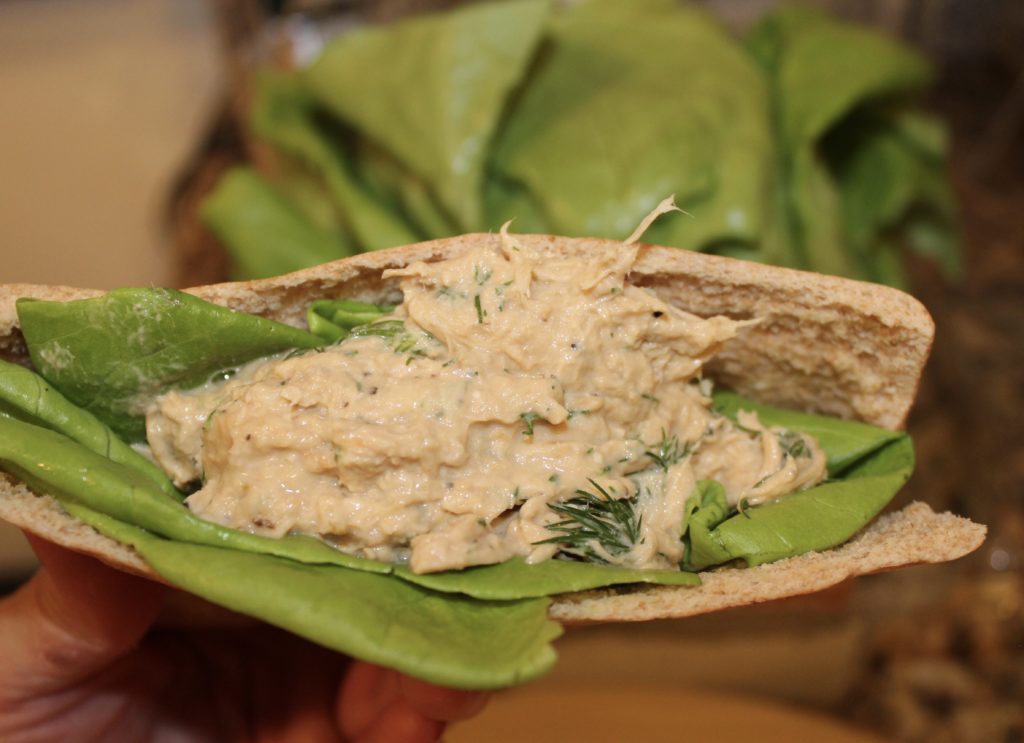
Without further ado, here’s my Organic Gluten Free, Lowfat, Low Salt, Heart Healthy, Gut Healthy Chicken Salad recipe:
6 organic chicken breasts (Costco)
1/2 a carton of unsalted chicken bone broth (Costco)
1 1/2 cup of organic lemon juice (Costco)
3 tablespoons organic black pepper (Sprouts)
2 cups no fat organic Greek yogurt (Costco)
6 oz organic Dijon Mustard (Sprouts)
2 packs of organic dill (Sprouts)

1. Rinse chicken breasts before placing them in the crockpot.
2. Pour the broth and lemon juice.
3. Sprinkle the black pepper and use your hands to evenly coat and distribute the pepper.
4. Set the setting on low for 20 hours.
5. After 16 hours, use tongs or a fork to shred the chicken.

6. Once cooked, the chicken should have absorbed most of the juices but place the shredded chicken in a colander to eliminate the rest of the liquid.
7. Move the chicken into a large bowl and add the yogurt and mustard.
8. Remove the dill from the stems and add to a small food processor, chopping finely.

9. Spoon out the dill onto the chicken and mix well.

Option 1: Add atop an organic spinach, Brussels sprouts, cucumber, cashew and dried blueberry salad. No dressing needed.

Option 2: Place inside an organic pocket lined with organic butter lettuce.
Enjoy!
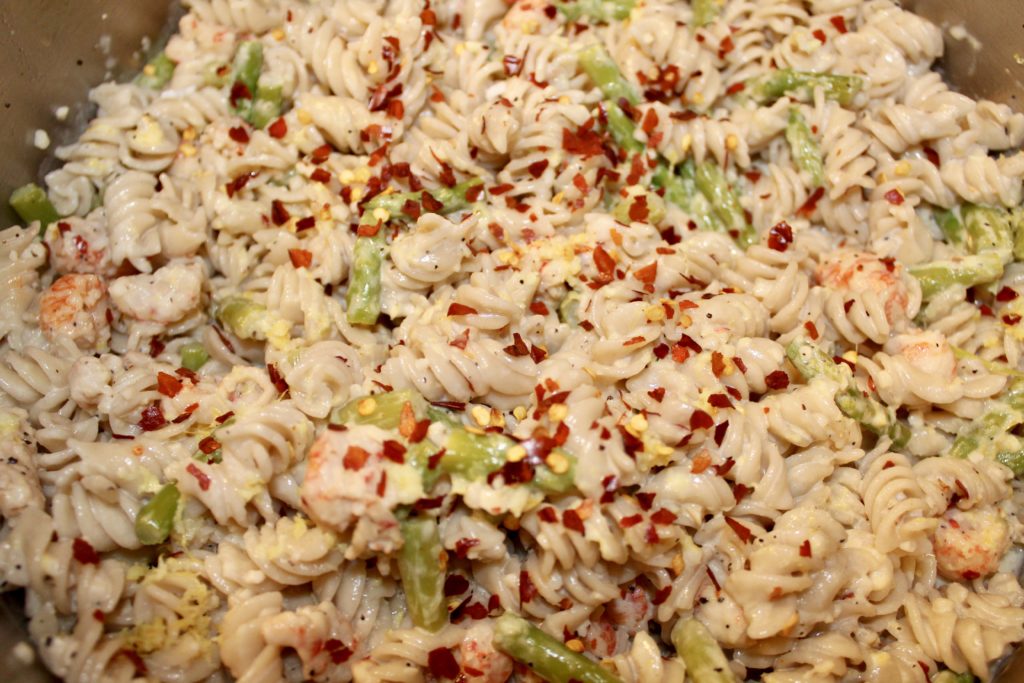
Sometimes inspiration for dinner strikes me at the most opportune times, like today, when I was in the midst of buying ingredients for what I thought I wanted to make for dinner. I had originally planned on grilling up some turkey burgers but needed to serve it with roasted potatoes or frozen tater tots or fries. I went to Sprouts in search of a bag of organic Yukon Gold potatoes but they didn’t have any in stock. On the way to the frozen aisle section, my eyes came across organic bag of frozen baby asparagus.

I am a huge fan of frozen veggies. They never go bad unless somehow they’re opened and not properly sealed and get freezer burn. I usually buy organic frozen peas, spinach and broccoli in bulk because they’re an easy and necessary addition to all home cooked meals. Organic frozen asparagus is like that unicorn one never expects to find. I grabbed two bags and immediately thought of a replacement dinner menu: a pasta dish with the frozen langostines I previously bought in bulk from Coscto, sautéed in garlic and butter, mixed in with freshly squeezed lemon juice and heavy whipping cream mixed with cut asparagus and topped with some lemon zest and sprinkles of crushed red pepper flakes.

I darted to the spice aisle since I was fresh out of red pepper flakes and after paying for my finds, I headed off to Trader Joe’s to get a bag of organic lemons, a bag of organic gluten-free brown rice and quinoa fusilli pasta and the organic heavy whipping cream.


To start, I took a 1/3 of the 2 lb langostines from the freezer and did a quick thaw in a bowl full of water and let it sit in the sink for about 15 minutes. I sealed up the remaining langostines in double Ziploc freezer bags and put them back in the freezer.


I got the pot of water boiling for the pasta and got the saute pan ready for the butter and garlic. In the meantime, I opened up the bag of frozen asparagus and proceeded to cut the asparagus in fourths, throwing out the ends. I wanted a size uniformity for the pasta, the langostines and asparagus.


I added 2 tablespoons of butter to the pan and swirled it around to coat the bottom completely. Then I added 2 tablespoons of crushed garlic (thank you Costco for selling these in big containers at $4.99 each). I added the thawed out langostines to the pan and seasoned them with a bit of black pepper.

When the langostines were halfway cooked, I added the pasta to the boiling water and the frozen asaparus to the pan.

I sautéed both the langostines and asparagus. After they were fully cooked, I removed them from the pan and placed onto a separate plate and stored in my warming oven.


I zested the lemons and saved the zest on a plate or bowl for later. I squeezed the lemons and set aside.

I added the remaining butter to the pan, melted it and added 1 tablespoon of garlic before adding the cream and lemon juice. I stirred frequently and kept it on medium heat so that it didn’t curdle.

Gluten free pasta tends to cook much faster than regular pasta so it’s important to watch your time, follow the estimate on the package and possibly set your timer. Once it’s al dente, I drained the pasta in a colander. Once it was fully drained, I placed the pasta back in the pot, added the previously cooked langostines and asparagus on top of the pasta and poured the sauce from the saucepan into the pot.
I mixed up all the ingredients making sure the sauce coated all the ingredients. I sprinkled a bit of red pepper chili flakes and added the lemon zest and served!

1 1 lb bag of organic gluten-free brown rice and quinoa rotini
1 lb frozen langostines, thawed
1 lb frozen organic asparagus
3 tablespoons of organic crushed garlic
4 tablespoons of organic unsalted butter
4 organic lemons
1 quart of organic whipping cream
Organic black pepper to season
Organic red chili pepper flakes to season
1. Thaw the frozen langostines in the refrigerator overnight or a quick thaw in a bowl of water.
2. Boil a pot of water
3. While the pot is boiling, place 2 tablespoons of butter in the saute pan and swirl to coat the surface.
4. Add garlic to the pan and spread it evenly before adding the langostines.
5. Season the langostines with black pepper.
6. Add pasta to the pot of boiling water.
7. Cut the frozen asparagus into thirds and add to the langostines when they’re halfway cooked, stirring often.
8. Once the langostines and asparagus are cooked, remove them from the pan, place them on a plate and into a warming oven or in the oven set at the lowest temperature.
9. Drain the pasta and place back in the pot.
10. Add 2 tablespoons of butter in the saute pan and add 1 tablespoon of garlic.
11. Add the cream and lemon juice, stirring often.
12. Keep it at medium heat for about 5 minutes.
13. Once the sauce is done, take the plate out of the oven and add to the pasta in the pot, adding the sauce on top.
14. Stir so that the ingredients are all blended together.
15. Add the lemon zest and sprinkle some red chili pepper flakes.
16. Serve and enjoy!

4 USDA prime filet mignon
4 tablespoons of organic virgin coconut oil
Organic black pepper
Mediterranean Sea salt
7 cloves of organic garlic, skins removed, chopped in mini food processor
Organic white mushroom, stems removed, hand shredded
Organic baby spinach

1. Take the filet out of the fridge and let rest in room temperature for 30-45 minutes.
2. Set the pan on the stove and heat on high.


3. Add 2 tablespoons of coconut oil to the pan and swirl to completely coat the pan.

4. Season the filet with salt and pepper on all sides and add to sizzling hot pan.

5. Cook all 4 sides, letting each side sear for about 5 minutes.

6. Add shredded mushrooms to the pan.

7. Remove the filet and let them rest of a cutting board.

8. Finish sautéing the mushrooms in the pan.
9. Remove the mushrooms from the pan and place on the cutting board or a plate.
10. Add 2 more tablespoons of coconut oil in the pan.


11. Once melted, add garlic and scrape off the filet drippings from the bottom of the pan, mixing with the garlic.

12. Add the spinach and sauté.

13. Remove spinach from the pan.
14. Slice the filet against the grain on the cutting board. If the meat is too pink, place back in the pan to cook for another minute or two on each side.

15. To serve, add the spinach on the plate first, place the slices of filet and sprinkle the mushrooms around the filet.
Note: For this recipe, I only had 5 mushrooms left and didn’t have time to sauté more spinach but to have even servings to go with the 4 filets, I suggest 15 mushrooms and repeating the stovetop spinach sauté twice more.
2 cups of organic coconut milk, boiled
4 cups of organic oats
2 tablespoons of organic peanut butter
1/2 cup organic honey
Optional toppings:
Organic fruit (berries, bananas, apples)
Organic notes (almonds, candied cashews)
1. Boil the coconut milk
2. Add the oats
3. Boil for 5 minutes, stirring constantly.
4. Add the peanut butter and honey
5. Boil another 5 minutes, stirring constantly
6. Turn off heat, stir and cover for 5 minutes
7. Stir
8. Put in large glass container and store in refrigerator
9. When ready to eat, take portion and place in bowl and microwave for 1 minute with a bit of coconut milk and a drizzle of honey
10. Add optional toppings if desired.
Makes 10 servings
Living in Los Angeles, one gets spoiled into thinking and believing that the sun is always shining. In the 40 years I’ve lived in LA, this has been the rainiest “winter” we’ve ever experienced. With the rains comes an extended or cyclical cold and flu season. Though I got the flu shot last year and (knock on wood) have not gotten the flu, I’m now at the beginning stages of my second consecutive cold.
The first one started right after the MLK, Jr. weekend. It started as a bit of fluid in my throat which I couldn’t clear. A week later, I started to cough which evolved into a hacking cough that spiraled out of control, eventually causing me to pull a rib muscle by the 3rd week of the cold. The 4th week added the discomfort of a sinus congestion but then finally by the 5th week, the symptoms appeared to have subsided, along with the rains.
Sadly, the reprieve would be short lived, much like the clear blue skies. The rain returned with a vengeance and so did Round 2 of my cold, complete with coughing and another pulled rib muscle on the opposite side.
This time, rather than being passive like the first round, I’m actively fighting it. I’m on oscilloccocinum, a homeopathic remedy primarily for flus though it tends to shorten or lessen the symptoms of a cold as well. I also changed my toothbrush, am gargling with warm salt water, drinking lots of water and organic green tea, will be taking naps and going to bed early. On day 3 of the cold, I got up early and went to the store to buy some zinc, organic grapefruit and organic ingredients for my homemade low sodium organic chicken soup.
The one ingredient I didn’t include is celery, due to my allergies. This delicate panda has her eyelid puff up like Will Smith in that movie “Hitch” so that I can’t actually see out of that eye so no celery for me. I did however put a whole onion and a whole garlic in the mix to ward off vampires and humans in general with my oh so attractive scent which will eventually come out of my pores. Also, onions and garlic have been used for centuries to help rebuild the immune system. I don’t normally eat carrots because of their sugar content but they are an excellent source of beta carotene which is a natural antioxidant. I used bone broth in lieu of regular chicken broth or stock as it has the added boost of more protein.
And now onto the recipe.

1 organic yellow onion, chopped


Grace Gambin

You must be logged in to post a comment.